Shopify Migrations Checklist: Protect Rankings and Get Cited by AI In This Easy-To-Follow Step-By-Step Guide
12 May 2026 Blog Posts
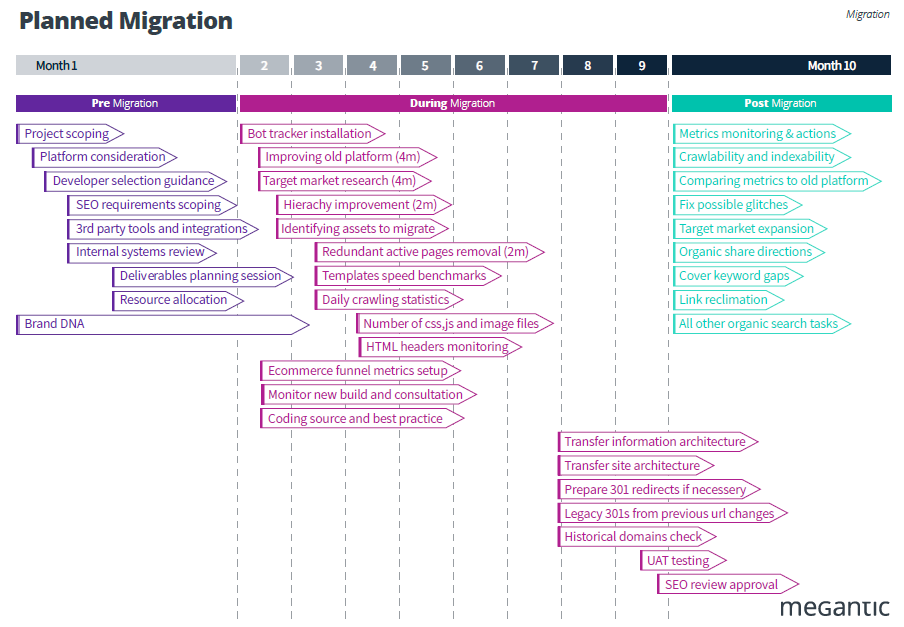
Migrating to Shopify is one of the highest-risk moments in an ecommerce store’s life. Done right, it becomes a foundation for long-term SEO growth. This checklist walks through every phase, from pre-migration planning, URL mapping, data import, and post-launch monitoring, so your rankings and revenue stay intact.
Most failed migrations share the same pattern… the website architecture is redesigned without SEO input, URLs change without a redirect plan, and 301s get thrown together the night before go-live.
This guide outlines a complete SEO-safe Shopify migration framework, covering every stage from pre-migration audits and architecture planning to redirect mapping, staging QA, launch-day validation, and post-launch monitoring. By treating SEO as a core workstream throughout the migration process, ecommerce teams can preserve existing rankings, retain link equity, minimise recovery time, and position their new Shopify store for stronger organic performance long after launch.
Phase 1: Pre-Migration SEO Audit
Before touching a theme or importing a single product, lock in a complete picture of what currently drives traffic and revenue. Crawl your store using Screaming Frog, Sitebulb, or a similar crawler to capture:
- Every indexable URL and its HTTP status code
- Canonical tags and pagination markup
- Page templates and internal link structure
- Duplicate content and crawl bloat (especially tag pages)
Export 12 months of Search Console and analytics data. Identify which product pages, collection pages, blog posts, and landing pages drive:
- Organic sessions
- Assisted and last-click conversions
- Revenue (connect to GA4 ecommerce data)
Audit your URL structure for SEO value and flag high-value URLs; there are pages with backlinks, strong impressions, or revenue attribution, as *do-not-change* priorities. These need either identical URLs on Shopify or clean, direct 301 redirects. Next, identify content gaps before you migrate. You can use Search Console’s Performance report to find keywords where you rank on pages 2-3. Remember: migration is the right moment to improve those pages, not just copy them across.
Phase 2: Plan Your Shopify Architecture
Define your target Shopify structure before developers begin work. Map legacy categories to Shopify collections. Decide which categories merge, which split, and which become new SEO-optimised collections. Many migrations are a chance to improve hierarchy, not just replicate it.
Replace tag pages with static collections. If your old store generated thin, auto-tagged URLs, plan to replace them with static, manually curated collections targeting real search demand, by style, brand, use case, or material. This reduces crawl bloat and concentrates link equity.
Write URL rules before development starts. Shopify enforces its own path structure (e.g. `/collections/`, `/products/`). Work within those constraints while keeping slugs:
- Keyword-rich and human-readable
- Consistent in casing (lowercase throughout)
- Free of tracking parameters or platform-generated suffixes
Build SEO into the project plan as a core workstream. Assign owners for crawl benchmarks, on-page SEO templates, redirect mapping, and content QA. Schedule recurring migration stand-ups with SEO, development, design, and merchandising together.
Phase 3: URL Mapping and 301 Redirect Strategy
The redirect map is the most important deliverable in any Shopify migration. You need to build a redirect spreadsheet starting with legacy URLS.
Organise your existing URLs into logical groups:
- Core collection and category pages
- Individual product detail pages
- Blog posts and evergreen content
- Brand, campaign, and hub pages
- Utility pages (FAQ, Contact, About)
Develop a clear redirect plan using a three-column spreadsheet to streamline developer workflows and support search traffic recovery.
|
Old URL |
New Shopify URL |
Redirect Type |
|
/category/womens-shoes |
/collections/womens-shoes |
301 |
|
/product/red-sneaker-v1 |
/products/red-sneaker |
301 |
Prioritise redirects by SEO value, and focus on pages with:
- Backlinks (check Ahrefs, Semrush, or Search Console’s Links report)
- High impressions or clicks in Search Console
- Conversion or revenue history in analytics
Use 301 (permanent) for all live-page migrations. Avoid redirect chains and map each old URL directly to its final Shopify destination. Handle product SKUs and handles carefully. Legacy SKUs with strong rankings need matching Shopify handles or explicit 301s. Changing identifiers without a redirect breaks the product page value even when the visual URL looks correct.
Phase 4: Content and Metadata Migration
Rankings are driven by content and metadata, not just URLs. Even a clean URL structure won’t retain rankings if the page content is weak, missing, or poorly optimised. Before migration, capture and preserve the metadata, headings, and on-page copy from every high-performing page.
For each priority URL, record:
- Title tag
- Meta description
- H1 and subheadings
- On-page body copy
- Key internal links pointing to and from the page
Improve weak content during migration, don’t just copy it. For product pages and collections with thin or duplicate descriptions, use this window to add:
- Unique value propositions
- Specific product details (materials, dimensions, use cases)
- FAQs that match long-tail search queries
Migrate image filenames, alt text, and structured data as these are frequently overlooked and can cause significant drops in image search and rich result visibility:
- Use descriptive, keyword-relevant image filenames
- Write unique alt text per image (not keyword-stuffed)
- Rebuild or transfer schema.org markup for products, breadcrumbs, and reviews
Migrate blog content with original slugs where possible. Blog posts often hold long-tail traffic that takes months to recover if abandoned. Where you can’t keep the exact URL, create a direct 301 from the old path to its Shopify blog equivalent. And remember to always test everything before you go live!
Phase 5: Staging Environment
Crawl the staging environment – With Shopify’s storefront password on, point Screaming Frog at the staging URL and verify:
- All internal links point to final Shopify URLs (no redirects in the internal link graph)
- No 404s for planned pages
- XML sitemap includes all priority URLs and excludes deprecated ones
Test redirects manually for the top 50 URLs. Check your highest-traffic legacy URLs in a browser and confirm each resolves in a single hop to the correct Shopify page with a 301 status. And verify metadata rendered in-page. Use a browser plugin or Screaming Frog to confirm title tags, meta descriptions, H1s, and canonical tags are rendering correctly on Shopify templates — not truncated or defaulting to theme placeholders.
Phase 6: Launch Day Checklist
Verify 301 redirects are active in Shopify. Check Shopify Admin → Navigation → URL Redirects. Confirm the full list imported correctly and test a sample of critical URLs.
Check for widespread 404s immediately after launch. Test your top 20 landing pages from Search Console. Any 404 on a high-traffic URL needs an immediate fix, not a ticket for next sprint. Keep legacy analytics and Search Console properties active
Don’t delete old properties. Use them to compare pre- and post-migration metrics side by side. Submit the new XML sitemap to Google Search Console
Remove legacy sitemaps referencing deprecated URLs. Submit the new sitemap and monitor the Coverage report for indexing errors.
Phase 7: Post-Launch Monitoring
Watch for these warning signs in the first 4 weeks:
- Spike in 404 errors in Search Console Coverage report
- Drop in crawl rate or crawl budget usage
- Loss of impressions for entire sections (usually signals blocked resources or broken internal links)
- “Discovered” and “currently not indexed” for priority URLs (check internal linking depth and sitemap inclusion)
Monitor conversion rate alongside traffic. If sessions recover but conversion stalls, iterate on Shopify templates: refine filters, surface key collections in navigation, and add supporting content like comparison tables or FAQs. Stores that aligned UX and SEO in their new structure have seen 40–60% increases in average order value.
Use migration as a launchpad for organic growth. After stabilisation, use Search Console data to find keyword gaps, look at topics where competitors now outrank you. Build new collections, supporting content, and internal links to capture those opportunities.
Quick-Reference Summary
|
Phase |
Key Deliverable |
Risk if Skipped |
|
Pre-migration audit |
Crawl + Search Console export |
Miss high-value URLs |
|
Architecture planning |
URL rules + collection map |
Crawl bloat, thin pages |
|
Redirect mapping |
301 spreadsheet (old → new) |
47% average traffic drop |
|
Content migration |
Metadata + copy + schema |
Rankings don’t transfer |
|
Staging QA |
Crawl + manual URL tests |
Post-launch 404s |
|
Launch day |
Verify redirects + sitemaps |
Indexing delays |
|
Post-launch |
Search Console monitoring |
Slow recovery window |
The damage is almost always done in week one. It’s crucial to get this part correct. There is some comforting good news: the stores using structured redirect mapping can preserve 95% or more of their link equity, compared to a 47% average drop in traffic for those who skip it. A Shopify migration handled with SEO at the centre and carefully organised for AI to read as clearly as humans consistently results in preserved rankings, faster recovery, and a platform architecture built for long-term organic growth.
A website migration can significantly improve your site’s performance, security, scalability, and overall user experience. Whether you’re changing platforms, updating your site structure, moving domains, or refreshing content, migration allows businesses to modernise their digital presence and support future growth. And when planned and executed properly, a website migration helps create a faster, more reliable, and SEO-friendly website that better serves both users and business goals.
Ensure you weigh up the benefits with the potential risks before beginning a website migration, and ensure the company you are working with is trustworthy and has proven results of their success.
How long do platform migrations take?
![]()


")


